Tuesday, August 30, 2011

Quilts: The Whole Story

As promised I tracked down one of my little darlings from last year, and had her mom (who is a teacher at our school) send in her memory book from last year so you can see some of our other monthly quilt pages. Unfortunately you won't be able to see the complete quilt which in my opinion is the best part- so you'll just have to use your imagination for that! If you have no clue what I'm talking about check out my original post about class quilts here.

Just so you get the whole picture! This is the cover we made for our memory books- probably will work on making these a bit cuter this year but we were kind of down to wire at the end of the year. =)

August- as seen in the original post. If you do a kissing hand project I think this quilt page would be super cute with a little heart glued to the middle of handprint (especially if you do yellow handprints instead of red like I did this year!).

September- I let the kids make any kind of pattern on their tree using the red, green, and yellow squares. If you are making a quilt out of this one alternate gluing the tree on the left  and right. Trust me it looks better this way!

October- Love this one! If you are making a quilt out of this one alternate putting the bat on the top and the bottom so your quilt will have a more balanced look.

November- LOVE LOVE LOVE this one. We have the kids wear their paper bag vests we use for pow wows. The leaf is made by having your kids color on coffee filters with brown, red, orange, and yellow. Fold up and drip water on them to make the tie dye  effect and the let dry. Then we glued them to yellow paper and die cut them into leaf shapes. I know it sounds complicated but I promise it's not hard!

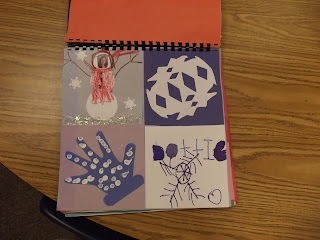
January- Unfortunately the kids got a little carried away when they were making their snowmen. I might reign them in a little for the sake of cuteness- although there is a lot to me said for self-expression! =) NOTE: I do not encourage my kiddos to draw on their name square, this particular example was a product of unsupervised sharpie use.

February- probably the least labor intensive of them all but so cute!

March- I like to take pictures of the kiddos eating green eggs and ham for their March picture. The four leaf clover is made similarly to the leaf on the November page except we just placed the outline of the shamrock on top of the trimmed coffee filter colored in green and yellow.

April- This year I'm planning on only doing the patterns on the name square and not on the bunny square.

May- I LOVE the way this one turned out! To get the marbled paint look for the butterflies line the bottom of a box or pan in wax paper. Squirt paint haphazardly on the bottom and just have kids place hands on top of the paint. You'll need to add fresh squirts every few kids to keep it fresh and not muddy looking! To make the quilt alternate gluing butterflies on top and bottom. 


So that's the completed quilt/memory book project. The last page of the memory book is a class picture with all the kids signatures. It really is such a sweet little gift for the kiddos at the end of the year. I hope you consider making these with your class. I'll keep you updated on any revisions I make to the process! I'm planning on adding a December page- December just got away from me last year, and I never got around to making one with my kiddos. I also teach in a school where lots of holidays are celebrated in December so I have to think on a quilt that is not too Christmasy. Let me know if you have any suggestions! 


Happy "Quilting"!
Jessie


2 comments:

  1. I love this idea. I will definitely incorporate it for my class next year. You are so creative, I am enjoying this blog. If you come up with an even snazzier cover I'd love it if you added that to the bog. Thanks for sharing!

    ReplyDelete