Friday, August 17, 2012

My Classroom Make Over

So it's been a crazy first week of school! I had great intentions of posting my classroom photos last week but...you know, stuff happened! It seems like at the beginning of the year a teacher's job is never done (who am I kidding, all year long that's true!). As much as a love my new batch of little ones I find myself longing for the reading and writing workshops of last year where everyone knew what to do and where to go. I always forget just how long it takes to be running like a well-oiled machine! I'm kind of wishing we could just skip ahead to October but I'm forcing myself to love these few days when random declarations of "Kindergarten is fun!" or "I Love School!" are common! These are precious times...

On to the main topic of this post- my new room. As I mentioned in a previous post I was gone for most of the summer and then when I came back I took care of my ten-month nephew for two weeks. So I had about a week to get my classroom together before preplanning started. This wouldn't have been a problem if I hadn't decided to change around EVERYTHING! Kind of silly on my part because I really loved my old classroom set up but I just got the rearranging bug and I had to follow through. Plus I had five more students on my roster than previous years so a little rearranging was necessary! I will say I tried to be super strategic about all my choices so that things that didn't work well in previous years were addressed and hopefully fixed. So here's the final product, what do you think?


This our math focus wall. The white signs are the problem solving strategies from KindergartenWorks (her guided reading pack is awesome!). The green pocket chart is for our essential questions and our math vocab cards. The clipboard holds our class data pages (I use the pack from lakeshore). The colored circles are burner covers from the Dollar store which makes them magnetic (I'm using them for grouping my kids into guided math groups- easy to change weekly based on our pre-tests!).  The small numbered boards to the left are for our math stations (these are white boards from the dollar store). I attached velcro to the right of each number where I'll put smaller colored circles to indicate which group is going to each center. I'll write math station specifics (i.e. computers, addition yahtzee, numeral practice) on the whiteboard part. Oh, there's a hundreds chart too!


Trying out the FACE acronym this year instead of CAFE. I'm going to surround our menu with the faces of my little kindergarten readers. I'll try to remember to post a picture of the completed project!

The front of my classroom, math station materials under the FACE board and math station board. My SMART board is down there too!

The rest of the front of my room and whole group space with our Reading Tree, Spin and Play Phonics Games, and our Language Arts focus board (its the blue board on the right side of this picture).

Part of our classroom library, green books=fiction, yellow= favorite authors. I moved my word wall to this wall this year. I used pocket charts from Target's Dollar Spot. It makes putting up words SO easy (definitely a plus!). The blue bins on top of the cubbies are our book bins. 


Here's a view from the door. To fit all the kiddos I have this year I had to switch my smaller rectangle tables to the really long ones- they fit 8 kids! I also still have two circle tables that seat four. I like how our whole group area is really sectioned off. It makes distractions coming from the hallway a lot less noticeable. 


This is our fence area that serves as word work storage, listening center space, and backpack hooks. It's a cozy little space that the kiddos love! We only take the cushions out when we're using this space, otherwise we store them on the shelf above the hooks.
 Another look at our word work bins. The blue bins are our cubbies. We keep our math "toolkits" and calendar books in here.
 Further back view from the front of the door. I LOVE my new guided reading table. Totally got inspiration from Deanna Jump (Love her classroom). The black stools are great because you can lift off the tops and store LOTS of stuff inside. I have lots of teacher stuff hidden behind this space.

Our Fancy Words board and computer station. Lots of other good stuff hidden under these computer tables. Seriously if you do anything skirt your tables! It triples your storage space!

A little corner near the computer station, a good place to read and our clip chart. Love this thing!!

Hope you enjoyed my classroom tour! I'm loving this space so far. We've made a few changes since the kiddos have come back but most things are working out great! Looking forward to really making this house a "home" with my new little kindergarten family!

Happy Decorating!
Jessie Roberts

Wednesday, August 1, 2012

Pinterest Project: Welcome Message and FREEBIE

So my stint in Africa this summer helped me turn my teacher brain off for a while which was so nice! However the second I got back I was back on pinterest pinning like mad, and it was so much fun! So every summer I find just amazing ideas from other teachers, and I get so inspired. Granted there are many, many pins on my boards that I will probably never get around to actually using but I've picked a few of my favorites to actually do this year.

So without further ado here is the picture of what inspired my first pinterest project!
Cute right? I love what a positive message this gives the kids and really anyone who enters your classroom. So I typed up my own version, changing around a little to meet my needs (I'm thinking this original door is on a science classroom). And here's the final product!


And as promised here's a freebie for you to create a door message of your own! I included some extra words so you can customize your message to fit you and your students.  I printed them out, cut them and then backed them with colorful cardstock. Download your copy here!

Enjoy!
Jessie

Saturday, July 28, 2012

An April Quilt

I ended up changing several of my quilts this year and April was one of them. I really love how it came out and it was much easier to do the flower handprints over the rabbits we use to do! So for this quilt it's four squares: a white square with flowers (TO DO: paint four fingers- no thumb green and have students press onto paper. Then paint over the bottom with green to make grass. We then used little flower diecuts to complete the project- mine are from the wedding section at Michaels.), a hot pink square with their name, a light green square die cut and then photo behind, and a vibrant blue with a diecut egg decorated by the kids and a die cut chick. I really loved this quilt because it highlighted two big events of our year: Eric Carle day (the picture is of the kids wearing their hungry caterpillar shirts) and chicks to commenorate hatching chicks in our class in May. The rest of our April wall was made complete with our spring trees and writing (the kids did 5 senses writing, i.e. "In spring, I see chicks. In spring, I smell flowers. In spring, I hear bees. etc."). We also made word family flowers. I gave each of the kids a center yellow circle with a word family we've worked on this year and then the kids had to cut and trace out petals. They wrote words that belonged to that word family on the petals. They did a really good job! Check out below how awesome our April wall looked. Gotta love spring!!

Enjoy!
Jessie


An upclose look

The completed quilt

Our Senses Writing

A good look at our complete wall with our word family flowers on bottom.

Eric Carle Day

So since I haven't posted in quite a long time I have lots to share!! One of my favorite days in my classroom is Eric Carle day. We've done this special celebration the past two years in my class as a closing to our month long study of Eric Carle books. This year I really beefed up our celebration and the kids had a blast. Defintiely going to do it again next year. I got most of my ideas from the Chets Creek Kinder Wiki- you have to check out all their amazing resources!

My favorite part of the day were the super cute t-shirts we made to wear! Our class always get SO many compliments are these awesome shirts that are actually really easy to make. I let the kids do most of the big stuff (with VERY careful supervision) and then I added all the details with puff paint after the base colors dried. I went ahead and washed them at home so I could hand them to the kids ready to wear!


Now for our activites- like I said we had a VERY busy day but it was so fun, and we got a lot of reading, writing, and math done! =) We started the day by reading Pancake, Pancake and doing a lesson about different types of goods and services featured in the book. We also did some sequencing activities and compared the differences between how the boy gets pancakes and how our class normally get them. And then of course we made pancakes!! We made plain, blueberry, and chocolate chip, and graphed our favorites- one guess for what won....yep chocolate chip (can't blame them, that's my favorite too!).

Then we went outside to play some games that went along with our three favorite books. Our first games was a Very Hungry Catepillar Relay. We dividied into two teams with the kids lined up with their team. They then had pass a story telling piece (parts from the story) down the line over/under style (you know over the head, then under legs of the next person, etc.). Honestly the kids had trouble with this because they just couldn't focus very long but we finally got through. When all the pieces were at the end of the line the kids had to work together to put the story in order.


Then we played a relay that went along with Pancake, Pancake. It was pretty basic relay where the kids had to balance a pancake (I have these random plush ones from a math game but you could use just foam or paper cutouts) on a spatula and drop it off on the plate at the end of the row. They then ran back pancakeless and passed the spatula to the next person. This one was really fun and the kids begged to do it several times! Sorry no pictures (guess I was busy corrallign the masses)!

Our last outside game was a Head to Toe relay/obstacle course. In Head to Toe the kids are all imitating animals so that was the inspiration for this game. I set up 5 cones in a line about five feet apart. On each cone was a picture of an animal and a motion (frog- jump, horse- gallop, penguin- waddle, crab-crab  crawl, bunny- hop). The way down the line the kids had to do the indicated motion from one cone to the next, and then once they go to the end they could run back. We had fun with this one, and it was a good indicatior of just how far we've come during the year with following directions! Horray!


Then we went inside for even more fun! We did a listening game with easter eggs to go along with The Very Quiet Cricket. I prepared pairs of eggs with the same type and number of objects inside (whatever I had lying around: jellybeans, push pins, pennies, erasers, etc.) Then I passed out the eggs to the kids, and they had to find their matching pair. It was a quick but fun game! I actually used the eggs several other times in the year to make partners. =)

 We made crabs using pasta noodles, large pompoms, and pipe cleaners to go with A House Hermit Crab (my personal favorite Eric Carle book). The kids were thrilled with these!! Seriously they walked around with them like they were real!


We made 100 legged centipedes and praticed coutning my tens. (We usually do this on the 100th day of school bu we ran out of time this year so it was perfect fit for Eric Carle day!!). It's kind of hard to see from the picture but the kid had to add ten legs on each circle and then count by tens (10 was on the first part of the body, 20 on the next, 30, etc.) 

 We also made two class books. One to go with The Mixed Up Chameleon. The sentence frame was, "I wish I could ________ like a _______." I printed out black and white pictures of the kids which they added their choosen animal details to.  I snuck in a mini-lesson/review of nouns and verbs during this assignment and all the kids projects turned out really cute.

 Our other class book was more for sight word review and went along with Eric Carle's book Have You Seen My Cat? In the story the main character travels the world looking for his cat and proclaiming, "This is not my cat!". Before starting the book we went on our own hunt around the school. I cut out butterflies using a die cut at school out of different scrapbook scraps (two butterflies out of each scrapbook pattern). In the morning my assistants and I went around the school and taped up one of each butterfly pair around the school. Then when we were ready for our hunt I handed out one butterfly to each child and intructed them they had to go searching for their matching butterfly. The kids LOVED this! And they were so cute going around the school asking, "Have you seen my butterfly?" (NOTE: we just stayed in a line and if the people in front saw one that wasn't there's they would just point to it as they passed!). Once we found all our pairs we went back to class and made our class book. The sentence frame was "This is not my butterfly!" The kids had to draw a picture of themselves and design a butterfly that wasn't like theirs. It turned out pretty cute.

 So that was our day! Lots and lots of fun. And the most talked about day all year! What are some of your favorite Eric Carle activities?

Hope you're enjoying your summer time!
Jessie

Tuesday, July 24, 2012

Labels and Other Things

Hi faithful followers! I feel so bad that I've been a blogger bum the past couple months (or a little longer than that!). School always seems to overwhelm me around March and I don't seem to get to take a breathe until we get out in May. Sound familiar? Then a week after school got out I left for a five week trip to Africa...which was AMAZING!


So anyways now I'm back, I've started to look through all my comments. I'm so thrilled so many of you are wanting to use my book bin labels in your classroom. I've gotten a lot of request for templates and other things. So I'm going to try and address all your questions here!

1) What kind of labels did you use? I didn't design the book bins to be used on sticky labels. I just printed mine on cardstock and then laminated them. I used masking tape to attach them to my plastic book bins. You could also do the hole punch and binder ring if you have one of those holey book bins.

2) Can you send me your template or the orignial document? Sorry no can do for two reasons! One I created the labels using Apple Pages (a program most people don't have). Two the graphics are created by Thistle Girl, and as part of my reselling license I can only offer projects in a non-editable format (like pdf files!).

3) The files keep showing up as a picture file! This shouldn't be happening but I'll post another link. It should open as a pdf file. Please note that you will not be able to edit any of the documents (see above question for the reason why!).  Make sure once you open them in googleDocs go to file (in the top left hand corner) and download. This should download the file to pdf to be printed!! Not sure why it's showing all those extra pages! You may want to select page by page of the labels you need so you don't waste paper. =)

Download Labels Here!

Hope that helps everyone with your beginning of the year preparations! Hopefully I'll be able to post more often this year but I'm not counting on it as I'm starting grad school in a few weeks!

Jessie


Wednesday, December 7, 2011

A December Quilt


If you've read some of my other quilt posts you'll know that I really wanted to figure out some sort of December quilt page that wasn't blatantly "Christmas-y". I have a lot of kids that celebrate Hannukah, and I wanted something that celebrated the season without excluding anyone. So here's what I ended up with! I LOVE it! So basically a four square design: a picture, name page with patterns  (I blurred the names on the green page with the white shape pattern), a decorated gingerbread man (to commemorate our gingerbread study), and handprint snowmen. To make the snowmen just paint the kids four fingers and the top half of the palm. Paint a white patch over it for the ground. After it dries have the kiddos decorate their snowmen using markers.

If you're interested in seeing more monthly quilt ideas that can later be put together for a memory book check out my other quilt post: Quilts

Happy "Quilting!"
Jessie

Monday, December 5, 2011

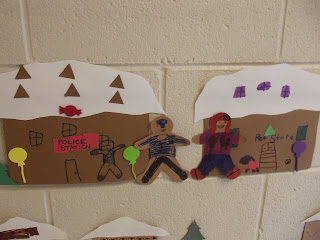
A Gingerbread Town: A Study of Economics

The minute I saw the idea for making a gingerbread town I just knew my class had to do it. In previous years I've made a town with my class as an extension to our mini-economic unit. It always turned out cute but I just knew with the added gingerbread theme it would just be beyond. I am so thrilled with way it turned out, and the kids are so proud! As an added bonus I finally found a way to cover our economic standards in a way the kiddos really connected to. So here's what I did:

Day 1: Needs and Wants- We watched the Brainpop Jr. on Needs and Wants and then we made a list of needs and wants.

Day 2: Good and Services- Adding on to day one's lesson we watched the Brainpop Jr. on Goods and Services. We then did the sorting activity on EconEdLink (we had a little trouble using this with our SMART board, not sure why). As an assessment the kids did this and this worksheet I found on education.com.

Day 3: Goods and Services in a Town- After reviewing our list of needs and wants we generated a list on the SMART board (I just typed into a SMART notebook as the kids gave ideas). We discussed how each idea satisfied the needs and wants on our previous list.

Day 4: Sorting Goods and Services- We used our ideas from Day 4 and sorting them into two groups goods and services. The kids really understood the concept at this point, and they did awesome with this.

Day 5: Creating a Town and Workers- This was the best! Each child choose a building to make for our town. In addition they created a "gingerbread worker" that would work at their selected business (i.e. a doctor for the hospital, a fireman for the fire station). They also created a house just for fun. =) Most of the kids really got into this and it turned out so great. Check out the pics below to see our creation!

I hope this gives you some ideas for creating a gingerbread town with your own little sweeties! I really can't say enough how much the kiddos loved this unit.


Happy Teaching!
Jessie