Showing posts with label quilts. Show all posts

Saturday, July 28, 2012

An April Quilt

I ended up changing several of my quilts this year and April was one of them. I really love how it came out and it was much easier to do the flower handprints over the rabbits we use to do! So for this quilt it's four squares: a white square with flowers (TO DO: paint four fingers- no thumb green and have students press onto paper. Then paint over the bottom with green to make grass. We then used little flower diecuts to complete the project- mine are from the wedding section at Michaels.), a hot pink square with their name, a light green square die cut and then photo behind, and a vibrant blue with a diecut egg decorated by the kids and a die cut chick. I really loved this quilt because it highlighted two big events of our year: Eric Carle day (the picture is of the kids wearing their hungry caterpillar shirts) and chicks to commenorate hatching chicks in our class in May. The rest of our April wall was made complete with our spring trees and writing (the kids did 5 senses writing, i.e. "In spring, I see chicks. In spring, I smell flowers. In spring, I hear bees. etc."). We also made word family flowers. I gave each of the kids a center yellow circle with a word family we've worked on this year and then the kids had to cut and trace out petals. They wrote words that belonged to that word family on the petals. They did a really good job! Check out below how awesome our April wall looked. Gotta love spring!!

Enjoy!
Jessie


An upclose look

The completed quilt

Our Senses Writing

A good look at our complete wall with our word family flowers on bottom.

Wednesday, December 7, 2011

A December Quilt


If you've read some of my other quilt posts you'll know that I really wanted to figure out some sort of December quilt page that wasn't blatantly "Christmas-y". I have a lot of kids that celebrate Hannukah, and I wanted something that celebrated the season without excluding anyone. So here's what I ended up with! I LOVE it! So basically a four square design: a picture, name page with patterns  (I blurred the names on the green page with the white shape pattern), a decorated gingerbread man (to commemorate our gingerbread study), and handprint snowmen. To make the snowmen just paint the kids four fingers and the top half of the palm. Paint a white patch over it for the ground. After it dries have the kiddos decorate their snowmen using markers.

If you're interested in seeing more monthly quilt ideas that can later be put together for a memory book check out my other quilt post: Quilts

Happy "Quilting!"
Jessie

Tuesday, August 30, 2011

Quilts: The Whole Story

As promised I tracked down one of my little darlings from last year, and had her mom (who is a teacher at our school) send in her memory book from last year so you can see some of our other monthly quilt pages. Unfortunately you won't be able to see the complete quilt which in my opinion is the best part- so you'll just have to use your imagination for that! If you have no clue what I'm talking about check out my original post about class quilts here.

Just so you get the whole picture! This is the cover we made for our memory books- probably will work on making these a bit cuter this year but we were kind of down to wire at the end of the year. =)

August- as seen in the original post. If you do a kissing hand project I think this quilt page would be super cute with a little heart glued to the middle of handprint (especially if you do yellow handprints instead of red like I did this year!).

September- I let the kids make any kind of pattern on their tree using the red, green, and yellow squares. If you are making a quilt out of this one alternate gluing the tree on the left  and right. Trust me it looks better this way!

October- Love this one! If you are making a quilt out of this one alternate putting the bat on the top and the bottom so your quilt will have a more balanced look.

November- LOVE LOVE LOVE this one. We have the kids wear their paper bag vests we use for pow wows. The leaf is made by having your kids color on coffee filters with brown, red, orange, and yellow. Fold up and drip water on them to make the tie dye  effect and the let dry. Then we glued them to yellow paper and die cut them into leaf shapes. I know it sounds complicated but I promise it's not hard!

January- Unfortunately the kids got a little carried away when they were making their snowmen. I might reign them in a little for the sake of cuteness- although there is a lot to me said for self-expression! =) NOTE: I do not encourage my kiddos to draw on their name square, this particular example was a product of unsupervised sharpie use.

February- probably the least labor intensive of them all but so cute!

March- I like to take pictures of the kiddos eating green eggs and ham for their March picture. The four leaf clover is made similarly to the leaf on the November page except we just placed the outline of the shamrock on top of the trimmed coffee filter colored in green and yellow.

April- This year I'm planning on only doing the patterns on the name square and not on the bunny square.

May- I LOVE the way this one turned out! To get the marbled paint look for the butterflies line the bottom of a box or pan in wax paper. Squirt paint haphazardly on the bottom and just have kids place hands on top of the paint. You'll need to add fresh squirts every few kids to keep it fresh and not muddy looking! To make the quilt alternate gluing butterflies on top and bottom. 


So that's the completed quilt/memory book project. The last page of the memory book is a class picture with all the kids signatures. It really is such a sweet little gift for the kiddos at the end of the year. I hope you consider making these with your class. I'll keep you updated on any revisions I make to the process! I'm planning on adding a December page- December just got away from me last year, and I never got around to making one with my kiddos. I also teach in a school where lots of holidays are celebrated in December so I have to think on a quilt that is not too Christmasy. Let me know if you have any suggestions! 


Happy "Quilting"!
Jessie


Saturday, August 27, 2011

Two Birds, One Stone- Class Quilts

If you are a kindergarten teacher you are probably familiar with the  frantic end-of-the-year memory book making sessions...or maybe not if you don't have serious problem with procrastination like me. I'm not sure where the whole kindergarten memory book tradition came from but in May of my first year in kindergarten it caught me completely off guard. I frantically printed out pictures from our year and haphazardly glued them in a bare book a few nights before our end of the year party. The next year I was slightly more organized but only slightly. Then last year I knew I had to end the madness so I came into the year armed with a plan. The best part of my memory book solution was that it also served as a great hallway display monthly (also something that caused me great anxiety each month!)- two birds, one stone.

So each month each student makes a 12 x12 inch square featuring their hand print, their name, and their picture. I put all the quilt squares together to make a class quilt (so cute!) and then save the individual squares. At the end of the year we stack all the pages together to make individual class memory books. The parents loved them last year (really who can resist hand prints!), and the process was amazingly easy. I'm tweaking some of the quilts this year but for the most part keeping the project the same. I place the individual pages into a quilt made from scrapbook page protectors taped together.  I will not take credit for most of my monthly quilt ideas as I got almost all my inspiration from Kinder By Kim and Mrs. Shehan's Kindergarten. If you're considering making a class quilt you should really check out their amazing websites. Here's a peek at some of our quilts from last year (unfortunately I forgot to take pictures of them all- I'll try to track them down!):
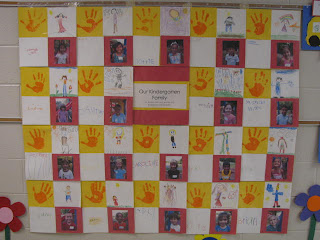
This was August (last year)- each students' square features their hand print, their picture, their name (written by them), and a self-portrait.
This is my August quilt from this year- a little bit different. I think red hand prints kind of look like blood so I changed the format a bit.


September- picture inside apple die-cut, apple tree hand print with patterns, and name.


October- name with pattern, bat (so cute- right?), and picture.

I couldn't resist showing you our full October wall- it's my favorite. We do conferences in October so we really go all out. The owls are our "Whooo" Are We Owls. The kids write clues for their parents and then their pictures are hiding under the owls. The pumpkins on the fence are actually glyphs.

January- snowflakes, name, picture on the face of the snowman (didn't love it but it was kind of cute), and hand traced on paper to look like mittens). This one was one of my least favorites but it was still cute.

Obviously this is our February quilt- name, picture, and heart handprint.


I'll try to track down pictures of some of our other creations. The November one is precious. This really is such a fun project. It was so cool at the end of the year to look at all the pictures from each month to see how much the kids have grown. The name portion of the quilt is like a little mini-assessment of your kiddo's name writing (so maybe this is a three birds, one stone project!).  Let me know if you have any questions! Thanks for all the comments- it really makes me happy to hear what y'all think!

Happy Weekend!
Jessie